
Following on from my previous article explaining drag-and-drop functionality, I’d like to show you how to implement ‘snapping’ objects to a specific place, such as a Scrabble grid:
How does it work?
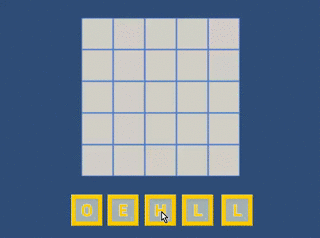
We will create a simple Scrabble/Words with Friends demo, with a few tiles that can be dragged onto a board grid, so we’ll:
- Create a board with a grid of possible letter tile positions.
- Create tiles with different letters on.
- Allow dragging of the tile objects.
- Determine where a tile should be placed when it is dropped.
- Smoothly move the tile to the correct position for a nice feel.
Get started
Create a new Unity project and choose the 2D settings. Download the sprites package below.


Build a game board
To build a game board, I created a simple square cell prefab with a sprite and a BoxCollider2D. I then created a row from 5 cells side by side. Finally, I stacked 5 rows vertically to create a grid. There’s nothing notable about the grid, so you should be able to create your own without detailed instructions, or you can just copy the one in the sample project.
Drag and Drop Script
The script that controls the drag-and-drop functionality is basically the same script from my previous article, so I won’t explain it again here. The main difference here is that the script calls some public methods on the Tile objects when a tile is picked up or dropped.
Here’s the drag and drop script in full.
Note: This script calls methods on the Tile script, so you can’t test this script out until you’ve also created the Tile script, which we’ll do next.
[code language=”csharp”]
using UnityEngine;
using System.Collections;
public class InputManager : MonoBehaviour
{
private bool draggingItem = false;
private GameObject draggedObject;
private Vector2 touchOffset;
void Update()
{
if (HasInput)
{
DragOrPickUp();
}
else
{
if (draggingItem)
DropItem();
}
}
Vector2 CurrentTouchPosition
{
get
{
return Camera.main.ScreenToWorldPoint(Input.mousePosition);
}
}
private void DragOrPickUp()
{
var inputPosition = CurrentTouchPosition;
if (draggingItem)
{
draggedObject.transform.position = inputPosition + touchOffset;
}
else
{
RaycastHit2D[] touches = Physics2D.RaycastAll(inputPosition, inputPosition, 0.5f);
if (touches.Length > 0)
{
var hit = touches[0];
if (hit.transform != null && hit.transform.tag == “Tile”)
{
draggingItem = true;
draggedObject = hit.transform.gameObject;
touchOffset = (Vector2)hit.transform.position – inputPosition;
hit.transform.GetComponent<Tile>().PickUp();
}
}
}
}
private bool HasInput
{
get
{
// returns true if either the mouse button is down or at least one touch is felt on the screen
return Input.GetMouseButton(0);
}
}
void DropItem()
{
draggingItem = false;
draggedObject.transform.localScale = new Vector3(1, 1, 1);
draggedObject.GetComponent<Tile>().Drop();
}
}
[/code]
The Tile Script
The tiles themselves have a script that handles what happens when the tile is manipulated.
Before we get to the full Tile script code I’ll explain what the script does.
We have two public methods (that are called by the InputManager script) to handle picking up and dropping the tile.
PickUp()
This method simply makes the tile a big larger and raises its sprite’s sorting order so it is always above whatever you’re dragging it over.
[code language=”csharp”]
transform.localScale = new Vector3(1.1f,1.1f,1.1f);
gameObject.GetComponent<SpriteRenderer>().sortingOrder = 1;
[/code]
Drop()
The important code in the Tile script is the Drop method. I’ll explain each piece of the method separately, and you can see it all together in the full Tile.cs script later.
The first thing we do is undo the scaling and sorting adjustment that was done when the tile was picked up:
[code language=”csharp”]
transform.localScale = new Vector3(1, 1, 1);
gameObject.GetComponent<SpriteRenderer>().sortingOrder = 0;
[/code]
In the OnTriggerEnter2D() and OnTriggerExit2D() methods, we keep a running list of any grid cells that the tile is currently touching. The code for that is straightforward, and you can see it in the full script code, so I won’t detail it here.
Knowing that we are keeping track of grid cells in contact with the tile we first check if the tile it touching any grid cells. If not, we set the tile back to its original starting position and make sure its parent is reset (as you’ll see in a moment, when a tile is dropped on the grid we make it a child of whichever cell it was placed into).
[code language=”csharp”]
if (touchingTiles.Count == 0)
{
transform.position = startingPosition;
transform.parent = myParent;
return;
}
[/code]
Deciding the Closest Cell
If the tile is touching only 1 cell, we drop the tile into that cell; if multiple cells are being touched, we cycle through them all and figure out which is the closest.
if (touchingTiles.Count == 1)
{
  newPosition = currentCell.position;
}
else
{
  var distance = Vector2.Distance(transform.position, touchingTiles[0].position);
  foreach (Transform cell in touchingTiles)
  {
    if (Vector2.Distance(transform.position, cell.position) < distance)
    {
       currentCell = cell;
       distance = Vector2.Distance(transform.position, cell.position);
    }
  }
  newPosition = currentCell.position;
}
Finally, we have to make sure the cell is not occupied before dropping the tile into it:
if (currentCell.childCount != 0)
{
  transform.position = startingPosition;
  transform.parent = myParent;
  return;
}
else
{
  transform.parent = currentCell;
  StartCoroutine(SlotIntoPlace(transform.position, newPosition));
}
Smoothing the Drop
One last thing we do is to make the tile slide neatly into its cell so it doesn’t appear to suddenly snap into place.
We achieve a smooth effect by using a co-routine to gradually move the tile’s position over a period of time until it’s exactly centered on the cell. We use the tile’s current position as the starting point and the cell’s position as the destination. Then we use Vector2.Lerp to move the tile closer and closer to the destination over the amount of time we specify.
One extra trick I added was to force the tile’s position to match the end position exactly once the co-routine has run its course. This prevents the possibility of the tile not perfectly lining up with the cell’s position due to rounding errors (you can think of it as a final check: if the tile’s position is not the same as the cell’s position then force it).
IEnumerator SlotIntoPlace(Vector2 startingPos, Vector2 endingPos)
{
  float duration = 0.1f;
  float elapsedTime = 0;
  while (elapsedTime < duration)
  {
    transform.position = Vector2.Lerp(startingPos, endingPos, elapsedTime / duration);
    elapsedTime += Time.deltaTime;
    yield return new WaitForEndOfFrame();
  }
  transform.position = endingPos;
}
The Full Tile Script
Here’s the tile script in full. I’ve also added an audio source to the tiles in the demo so the tiles make a nice sound when they slide into place.
using UnityEngine;
using System.Collections;
using System.Collections.Generic;

public class Tile : MonoBehaviour
{
   private Vector2 startingPosition;
   private List<Transform> touchingTiles;
   private Transform myParent;
   private AudioSource audSource;

   private void Awake()
   {
     startingPosition = transform.position;
     touchingTiles = new List<Transform>();
     myParent = transform.parent;
     audSource = gameObject.GetComponent<AudioSource>();
  }

  public void PickUp()
  {
     transform.localScale = new Vector3(1.1f,1.1f,1.1f);
     gameObject.GetComponent<SpriteRenderer>().sortingOrder = 1;
  }

  public void Drop()
  {
     transform.localScale = new Vector3(1, 1, 1);
     gameObject.GetComponent<SpriteRenderer>().sortingOrder = 0;
     Vector2 newPosition;
     if (touchingTiles.Count == 0)
     {
        transform.position = startingPosition;
        transform.parent = myParent;
        return;
     }
     var currentCell = touchingTiles[0];
     if (touchingTiles.Count == 1)
     {
        newPosition = currentCell.position;
     }
     else
     {
        var distance = Vector2.Distance(transform.position, touchingTiles[0].position);
        foreach (Transform cell in touchingTiles)
        {
           if (Vector2.Distance(transform.position, cell.position) < distance)
           {
              currentCell = cell;
              distance = Vector2.Distance(transform.position,    cell.position);
           }
       }
       newPosition = currentCell.position;
   }
   if (currentCell.childCount != 0)
   {
      transform.position = startingPosition;
      transform.parent = myParent;
      return;
   }
   else
  {
     transform.parent = currentCell;
     StartCoroutine(SlotIntoPlace(transform.position, newPosition));
 }
}

 void OnTriggerEnter2D(Collider2D other)
 {
    if (other.tag != "Cell") return;
    if (!touchingTiles.Contains(other.transform))
    {
       touchingTiles.Add(other.transform);
    }
 }

 void OnTriggerExit2D(Collider2D other)
 {
    if (other.tag != "Cell") return;
    if (touchingTiles.Contains(other.transform))
    {
       touchingTiles.Remove(other.transform);
    }
 }

 IEnumerator SlotIntoPlace(Vector2 startingPos, Vector2 endingPos)
 {
    float duration = 0.1f;
    float elapsedTime = 0;
    audSource.Play();
    while (elapsedTime < duration)
    {
       transform.position = Vector2.Lerp(startingPos, endingPos,   elapsedTime / duration);
       elapsedTime += Time.deltaTime;
       yield return new WaitForEndOfFrame();
    }
    transform.position = endingPos;
  }
}
That’s All, Folks
That’s everything. You can check the demo project if you can’t recreate the functionality fully.
Great read and walk-through of the process! How would you change the tile code to be a specific polygon shape? So instead of squares an arrow shape or two that could link together?
I suppose you could use specific points on each shape (or outside the shapes) as the connection point. A jigsaw puzzle could be done quite easily. For two arbitrary shapes it might be a bit tricky. I suppose you would give each shape two connection points (depending on whether it is the ‘male’ or ‘female’ object), and use those points to determine where each one fits.
Great tutorial…can u help me to highlight tile color before place to new position…i tryed but can’t work can u help me plz…
my modified code here….
if (touchingTiles.Count == 1)
{
currentCell.GetComponent().color = Color.green;
newPosition = currentCell.position;
}
else
{
var distance = Vector2.Distance(transform.position, touchingTiles[0].position);
foreach (Transform cell in touchingTiles)
{
if (Vector2.Distance(transform.position, cell.position) < distance)
{
currentCell = cell;
distance = Vector2.Distance(transform.position, cell.position);
}
}
currentCell.GetComponent().color = Color.green;
newPosition = currentCell.position;
}
It looks like you figured it out! Great. You could also add a separate sprite (e.g. a square a little bit bigger than the tile), and turn off the renderer normally, but have it turned on when the tile is in the right position.
currentCell.GetComponent().color = Color.green;
That line won’t work. You’ll need:().color = Color.green;
currentCell.GetComponent
You need to specify which component (SpriteRenderer) you want to change.
currentCell.GetComponent().color = Color.green;
its work ..but i wont to highlight cell color which is near of selected tile before they placed.
in my code they highlight cell but more than one. i want only one cell to highlight …so what can i do?
can u plz help me?
public void PickUp()
{
Debug.Log (“pickup”);
transform.localScale = new Vector3(1.1f,1.1f,1.1f);
gameObject.GetComponent().sortingOrder = 1;
//here i changed code
StartCoroutine (“change”);
}
IEnumerator change(){
while (true)
{
yield return null;
Vector2 newPosition;
float distance =Mathf.Infinity;//Vector2.Distance (transform.position, touchingTiles [0].position);
foreach (Transform cell in touchingTiles) {
if (Vector2.Distance (transform.position, cell.position) < distance) {
currentCell = cell;
distance = Vector2.Distance (transform.position, cell.position);
Debug.Log (distance);
Debug.Log (currentCell.name);
}
currentCell.GetComponent ().color = Color.white;
}
if (currentCell != null) {
currentCell.GetComponent ().color = Color.green;
newPosition = currentCell.position;
}
}
}
here i changed code…its work properly but….but highlight more than 1 tile and i want only one tile which is less distance .
help plz
yapiiii… its work proper now… if anyone want to refer or help..u can see
IEnumerator change(){
while (true)
{
yield return new WaitForEndOfFrame();
Vector2 newPosition;
float distance =Mathf.Infinity;//Vector2.Distance (transform.position, touchingTiles [0].position);
currentCell=null;
foreach (Transform cell in touchingTiles) {
if (Vector2.Distance (transform.position, cell.position) < distance) {
currentCell = cell;
distance = Vector2.Distance (transform.position, cell.position);
Debug.Log (distance);
Debug.Log (currentCell.name);
}
cell.GetComponent ().color = Color.white;
}
if (currentCell != null) {
currentCell.GetComponent ().color = Color.green;
newPosition = currentCell.position;
}
}
}
At some time in the code, the object will stop receiving any input and cant be picked. Happens to me.. Im still figuring this thing out how.l
I figure out the problem. Can you elaborate why did you use bitwise opeartion on layermask instead of just assigning it direction throught editor? The use of bitwise operator makes it less readable.
There’s no particular reason the layermask was added in code rather than via the Inspector. It will work the same regardless. I think I just added that in at the last minute, and I personally prefer to keep anything that won’t change out of the Inspector so it can’t be accidentally modified.
Hello, thanks for great example!
I have a question. For example,here, let two letters pin to each other. How can we handle with this ? How can drag and snap them like one object ?
I would probably make one of the letters a child of the other one, then moving the parent will also move the child.
To make an object a child, you set its parent property, something like this:
object1.transform.parent = object2.transform;Thank you mate. I used a method like that.
Hi, is it possible to make it so that each individual Tile can only go into a specific Cell? For example, H can only go to Column 1 Row 3 Cell, E can only go to Column 2 Row 3 Cell, L can only go into Column 3 row 3 Cell and so on. Thank you for creating such wonderful tutorials.
You can achieve this by giving each cell in the grid a script that contains a reference to it’s name or position or something else. Then, when the player attempts to drop a tile into the cell, compare the cell’s reference value to see if it is a valid position for that tile.
You might give the cell an array of allowed values (e.g. which letters it can accept, “H”, “W”, “A”, or whatever – or just a single letter that is allowed).
You would then need to add a variable to the Tile script to hold that tile’s value, such as the letter it represents.
When a tile is dropped onto a cell, check if the tile’s value (e.g. “H”) matches an allowed value in the cell.
can you give me a script on how can i make it in a array form?
Hi , great tutorial both snapping and drag and drop you did previously.
I was wondering how can i achive this;
I would like not to move the tiles once it is snapped.
Should i change the layer or disable collider.
Thanks
Both those options should work. I would prefer to have a variable on the tile that determines whether or not it can be picked up. Set it to false when the tile is ‘locked’ in place, then check the value when the player tries to pick it up.
You mean I need to have separate variable to check before raycast hit and make draggable true . Im referring the previous tutorial of drag and drop sorry.
You can do it a number of ways. You will either want to prevent the player from interacting with the tile at all (e.g. disable its collider or change the layer, as you suggested) or let the player interact, but prevent them from dragging it by setting a variable to disallow movement.
Here’s how I would do it:
Add a new variable to the tiles called ‘CanDrag’ or something (or ‘InGrid’, depending on what makes more sense to you), which should be defaulted to true. When the tile is successfully dropped into the grid, set CanDrag to false.
(You might want to do it the other way around, since bool variables are false by default – make the variable called ‘DragDisabled’ perhaps, then it will automatically default to false, and you can set it to true when required).
When the player tries to pick up a tile, check if CanDrag is true before allowing it. This would be *after* the raycast hit (otherwise, how would you know what tile the player is trying to pick up?) but before you actually start the dragging.
It would be simpler to disable the collider (just disable it when the tile is dropped). The player would be unable to pick it up again. The problem with this technique is that it would be difficult to determine the state of the tiles if you needed to do anything else. It’s easier to check ‘CanDrag’ in code than to check if the collider is enabled. It’s also less clear in the code. Disabling the collider doesn’t make obvious sense to someone reading your code (including your future self), but ‘CanDrag’ has an obvious meaning.
All the tiles should already have the same Tile script. Making the change to the script should therefore affect every tile. Therefore each tile has its own instance of the script and the corresponding ‘CanDrag’ variable.
It should only need a few lines of code.
In Tile.cs:
public bool CanDrag = true;
In InputManager, adjust the picking up method to check if the tile can be dragged:
private void DragOrPickUp()();
{
var inputPosition = CurrentTouchPosition;
if (draggingItem)
{
draggedObject.transform.position = inputPosition + touchOffset;
}
else
{
RaycastHit2D[] touches = Physics2D.RaycastAll(inputPosition, inputPosition, 0.5f);
if (touches.Length > 0)
{
var hit = touches[0];
if (hit.transform != null && hit.transform.tag == “Tile”)
{
var tile = hit.transform.GetComponent
if(tile.CanDrag)
{
draggingItem = true;
draggedObject = hit.transform.gameObject;
touchOffset = (Vector2)hit.transform.position – inputPosition;
tile.PickUp();
}
}
}
}
}
And in the Tile.cs script, set CanDrag to true or false when the tile is dropped (false if it is dropped in the grid, true if it is returned back to its starting position).
Hi
It worked well.
I was not really using exact script of yours , i was using touch.phase along the first issue i had was. tiles not moving as fast as my finger moves so there was chance my finger to be off from collider and then it stuck there.
i have solved all of my issues because of you.
Thank you so so much for all your time. Really appreciate
Good work you doing . please keep it up.
one more question 🙂
actually I tried that way CanDrag enable and disable.
when its dropped CanDrag is false , it works fine until the script is attached more than one object.
if it is more than one object than everything is fine but after drop and even CanDrag is false still it can drag.
Are you putting the variable on the wrong script? It needs to be on the tile script, so that you can set it per tile. And you need to make sure you check it on the tile the player is interacting with as well.
actually I tried that way CanDrag enable and disable.
when its dropped CanDrag is false , it works fine until the script is attached more than one object.
if it is more than one object than everything is fine but after drop and even CanDrag is false still it can drag.
yeah the whole script is attached to the tile.
when it is attached to one tile its working as i want but if i attach to multiple tiles then it doesn’t work.
still i am trying to figure it out.
I was using one script . got it.
Thank you so very much for all the replies.
Cheers
Thank you for this awesome tutorial.
I am trying to group to two letters together and have them stick to the grid as a pair. Meaning both have to stick to the grid or nothing sticks at all. For example if one letter falls withing the grid, but the second is outside, then the neither letters will stick.
I have been stuck on this for while, please give me a hand. Thank you!!!
I’d group the letters together somehow (e.g. in an array), then when they are released I’d check if either isn’t placed in the grid, and then cancel the placement of both if one isn’t placed in the grid.
HOW TO CHECK IF IT IS CORRECT OR NOT?
How to check if what is correct?
Random word after you spell the hello it will refresh and another word. please help me huhuhu
Hi Damien!
Great post! Just like some other posters im curious into having a target system for the game. Where you can drag one object into only its specified target. I read the psuedocode you posted above but would love if you could help show the implementation thanks
You are a lifesaver! I’m pretty new to Unity ans have been trying to come up with somthing like this for the past few days, yet nothing worked the way I wanted it to. So kudos to you, you solved all my problems with these two wonderful tutorials! <3
Years later and this is still helpful, thanks for the info! I am having one issue though…
For some reason the tiles do not seem to want to snap to my cells. Is there any script specifically for the cells, or are you just giving them a collider, “Cell” tag, and then calling them in your Tile script? My tiles hover over the board, but only go back to their starting position instead of snapping to the grid that I have created. I’ve gone through the code several times and everything seems to match; I’ve got the InputManager on an empty game object and the Tile script attached to all my tiles (I’m actually using dominoes instead of letter tiles).
Any insight you can offer is greatly appreciated, and thanks in advanced!
The Tile script handles the snapping.
I would guess what is happening is that your tile isn’t detecting that it’s touching the grid cells (if the dragged tile isn’t touching any cells it will return to where it started when released).
Make sure the correct tags and layers are used. Cells in the grid must be tagged ‘Cell’. The OnTriggerEnter2D method is where touched cells are detected, and this line is checking the tag:
if (other.tag != “Cell”) return;
Thanks so much for the response!
I believe I have all my tags correct, and the OnTriggerEnter2D method is all correct. I have my dominos tagged as “Tile” and each grid space tagged as “Cell”.
The spelling is all proper and I’ve been sure to make sure capitalized letters are matching.
As for the layering, I have tried switching the Sorting Layer and Order in Layer for both objects, but nothing has got the pieces snapping together.
I’m using Unity 2020, could there be a version compatibility issue? I’ve also tried slightly adjusting the scripting, but no luck.
Could there be a box I’m not ticking or component I’m not adding? A few sources online were suggesting to add a rigidbody, but that didn’t seem to get me any further either.