Polishing it Off
We’re now at the end of our fun, enlightening, and probably exhausting journey to recreate Pong. In this final part we will add polish to the game and learn a few more titbits of Unity wisdom before signing off on Pong (or whatever you’ve called your version). Then we’ll build a standalone version of the game that can run on any computer without needing Unity. If you have access to a mobile device, I’ll touch a little bit on building and deploying to those, but with so many platforms and other variables, it’s outside of our scope to go into detail about that.
Snazzy Effects
We’ll add a few cool effects to our game to really up the fun factor. The best games have a lot of ‘juice’ – extra touches that make every frame addictive fun. Think of the Candy Crush clunk sounds or Angry Birds’ crashing, tumbling blocks. Granted, our Pong clone is not the height of fun or sophistication, but with these extra touches we’ll prove that even the simplest of games can be improved a lot by a few flourishes.
Shake the Camera
A simple, effective drop of juice is the camera shake. You see it in lots of games, and it gives a sense of kinetic energy, augmenting sound and vision to create something physical on a flat screen.
If you recall all the way back to Part 1 you may remember that our scene (and all scenes) has a default camera. You’ll also recall that all GameObjects (the camera is a GameObject) have a transform component, which determines its placement, rotation, and size. Therefore, if you move the camera’s transform you are effectively moving the view of the scene, or – from the perspective of the player – you’re moving the game area. If you quickly move the camera in small, random jolts, the screen will shake!
We will add a script to our MainCamera GameObject with a simple Shake() method, and we’ll call this method from GameManagerScript.
Create a new C# script called CameraShakeScript (remember to place it in the Scripts folder). Paste the following code into the script:
using UnityEngine;
using System.Collections;

public class CameraShakeScript : MonoBehaviour {
  // remember the correct starting camera position so we can revert   back once shaking is complete
  private Vector3 originPosition;
  private Quaternion originRotation;
  public float originalDecay = 0.006f;
  public float originalIntensity = 0.04f;
  float shake_decay;
  float shake_intensity;
  private bool shaking; // is the camera supposed to be shaking at the moment
  Transform cameraTransform;

  void Start() {
    cameraTransform = Camera.main.transform;
  }
  void Update (){
    if(!shaking)
    return;
    if (shake_intensity > 0f)
    {
       cameraTransform.localPosition = originPosition + Random.insideUnitSphere * shake_intensity;
       cameraTransform.localRotation = new Quaternion(
       originRotation.x + Random.Range (-shake_intensity,shake_intensity) * .2f,
       originRotation.y + Random.Range (-shake_intensity,shake_intensity) * .2f,
      originRotation.z + Random.Range (-shake_intensity,shake_intensity) * .2f,
      originRotation.w + Random.Range (-shake_intensity,shake_intensity) * .2f);
      shake_intensity -= shake_decay;
   }
   else
   {
      shaking = false;
      // reset the camera to its original state
      cameraTransform.localPosition = originPosition;
      cameraTransform.localRotation = originRotation;
   }
 }

 public void Shake(){
   if(!shaking) {
   originPosition = cameraTransform.localPosition;
   originRotation = cameraTransform.localRotation;
   }
   shaking = true;
   shake_intensity = originalIntensity;
   shake_decay = originalDecay;
  }
}
When Shake() is called, the camera is moved around randomly based on the intensity and decay variables (the decay determines how long the shake lasts and the intensity determines how much movement there is). Every frame the camera will shake if the shaking boolean variable is set to true. Once the shake is finished that value reverts to false.
- Save that script and attach it to the GameManager GameObject.
Open GameManagerScript. We’ll use Unity’s find method to get a reference to the camera to demonstrate the syntax a bit more, but you could just as easily use [SerializeField] and drag CameraShakeScript into the empty field in the Inspector.
CameraShakeScript camShake;Now, in Start(), populate the variable so it can be used in the script (place this line before the StartNewGame() call:
camShake = GetComponent<CameraShakeScript>();Now we can make the camera shake by calling the Shake() method on cameraShake like this, which you need to add to the GoalScored() method at the start, so the camera will shake whenever a goal is scored:
camShake.Shake();Test the Shakes

Particles
Our particle effect is going to be rudimentary, but it will give you an idea of how particle systems work. We will display an ‘explosion’ of debris when a goal is scored.
Like everything else, a particle system is a component. We will attach our particle system to the goals, and to do this we will add it to the goal prefab.
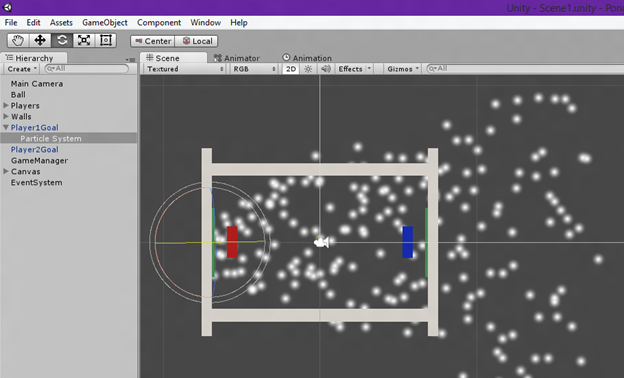
Create a new ParticleSystem in the Hierarchy:
- GameObject | Particle System

It should look like this:

We’ll change this to make a few bits of white debris to fly off the goal when a goal is scored.
With the particle system selected in the Hierarchy you’ll notice it has a lot of settings in the Inspector:

Make the following modifications:
- Change Duration to 0.25 (how long the particle system shoots out particles)
- Change Start Lifetime to 0.5 (how long a particle sticks around for)
- Untick Play On Awake (we don’t want the particle system to automatically start)
- Change Emission Rate to 40 (click the Emission heading to expand it first)
- Make the particle system a child of Player1Goal.
- Reset the particle system’s transform (i.e. set its position to 0, 0, 0 or click the cog in the Transform component and choose Reset).
- Make the Particle System GameObject a child of Player1Goal (drag-and-drop it in the Hierarchy).
- Reset the particle system’s transform by clicking the cog and selecting Reset in the Inspector with the Particle System GameObject selected. This sets the particle system’s transform to match the goal it’s attached to.
- Change the Particle System‘s transform’s rotation values to X = 0, Y=90, and Z = 0. This makes the particles shoot out from the goal.
- Lastly, untick the Looping property of the particle system. This will turn off the particle simulation.
Now we’re going to do something new. We’re going to ‘re-prefab’ our GoalPrefab. This means we are going to update GoalPrefab with changes we’ve made to one of its instances. To do this, drag-and-drop Player1Goal from the Hierarchy onto GoalPrefab in the Prefabs folder (you’ll need the Prefabs folder to be open in the Project window). Once you’ve done this the particle system will become part of the prefab, and Player2Goal will automatically get a matching particle system! That’s the power of prefabs, sir or madam!
Because Player2Goal is a carbon copy of Player1Goal the particle on Player2Goal will face in the same direction – but it needs to be facing the opposite direction, away from its own wall. To fix this, simply change Player2Goal’s Particle System Transform Rotation X value to 180 in the Inspector. This flips it on its X axis.
Script the Particle System
Before we can see our particles in action we need to fire it off at the appropriate time. Open GoalScript.
Insert this new variable:
[SerializeField]
ParticleSystem partSys;
Then change the OnCollisionEnter2D() method to this:
void OnCollisionEnter2D(Collision2D other)
{
  if(other.transform.name == "Ball")
  {
     gameMan.GoalScored(attackingPlayer);
     partSys.transform.position = new     Vector2(partSys.transform.position.x, other.transform.position.y);
     partSys.Play();
  }
}
Here we move the particle system to the same position as the ball at the moment it hits the goal, then play the particle emission at that location so it looks like some debris is being chipped off the goal by the ball. Snazzy.
- Save the script then head back into Unity.
For each of the player goal GameObjects:
- Select the object, then drag its particle system child into the Part Sys field in the Goal Script Inspector entry. This populates the partSys variable with the particle system so the script has something to play.
Play the game…
Game Over
We’re done! We’ve completed our Pong clone. It’s no masterpiece, but hopefully it has taught you the main building blocks of creating a game in Unity. If you look back through these ten lessons you’ll see that you’ve learned a lot, and hopefully some of it has stuck! You should have a pretty solid grasp of GameObjects, MonoBehaviour scripts, components, the Inspector, and so on, perhaps enough to embark on your own game.
There are also lots of ways to improve on our Pong clone. Here are some suggestions:
- Improve the UI.
- Animate something in the main menu screen (a bouncing ball perhaps).
- Stop the ball after every goal and have a 3…2…1…GO timer before play resumes.
- Add some extra effects:
- A bounce sound when the ball hits a wall
- Flashing when a goal is scored
- Implement an AI opponent for single-player action
- Show the score on the End Game screen.
I hope you’ve learned a lot from these tutorials and – more importantly – I hope you’ve had fun!
I just worked through this tutorial. It was just what I needed to get some more experience in working with Unity 3D.
Thanks!
Thanks for the tutorial
Thank you so much for the tutorial! In your game are the paddles supposed to be able to move through the walls? What would be an easy way to make sure they don’t?
I can’t remember if the paddles moving through the walls is intentional…
A simple way to fix it would be to set a minimum and maximum y-position, then whenever the paddles are moved, limit the position to those values. For example, if the position you are moving to is supposed to be higher than the y-maximum, simply change the position to the y maximum.
Nice tutorial. Easy to follow, a few problems but very clear. Better than a video for beginners of Unity. It works and gives a taste of things to come.
Great tutorial. Thanks for making this.
Thank you so much for this series. You’re awesome!