Wired for Sound
In this part of our Pong tutorial series we will finally add sound to our game! We’ll also get a bit more practice with scripting and the Unity UI system.
Sound Assets
You probably know the drill by now – create a new folder within Assets called ‘Audio’, and drag the sound files from the assets .zip into that folder (you can download the assets .zip file here). They will automatically have the correct names based on the file names.
We want to add sounds when the game is played, so start by opening the main game scene (Scene1).
- Select GameManager in the Inspector
- Add an AudioSource component (in the Inspector – Add Component | Audio | AudioSource).

Update GameManagerScript
We need to add variables that hold references to our sounds in GameManagerScript so we can play them at our leisure. Open GameManagerScript and add the following variables:
[SerializeField] AudioClip goalScored;
[SerializeField] AudioClip endGame;
Also add this variable, which we’ll treat a bit differently:
AudioSource audSource;Save the script.

Drag the relevant audio clips onto the above variable fields via the Inspector in the same way we’ve done for other components in previous parts. This lets us populate those variables with the correct sound file.
We could (or rather should) do the same with the AudioSource (i.e. drag a component into the Inspector), but we’ll use a different method just so you can see this other method in use. Unity has ways to ‘find’ a GameObject or component within the current scene (or the GameObject that the current script is attached to). We’ll use one of those ways to find the AudioSource.
Add the following to GameManagerScript‘s Start() method (it doesn’t matter whereabouts in the method this goes):
audSource = GetComponent<AudioSource>();That line looks through the GameObject this script is attached to and finds a component of type AudioSource, then puts a reference to it in our audSource variable. A similar method lets you find a GameObject:
// not code for your Pong game, just sample code to illustrate
player = GameObject.Find("Player1");
There are a few variations on these that we won’t go into, but you can find anything in your scene using these finder methods.

We need a method to play a sound, so add this method to GameManagerScript:
void PlaySound(AudioClip soundClip)
{
   audSource.clip = soundClip;
   audSource.Play();
}
That should be pretty easy to understand. We must call this method any time we want a sound to play. We send the specific sound clip as a parameter so the method knows which to play. The audSource variable is our audio source, and the soundClip parameter is the specific sound we want to play via the audio source.
Add Calls to PlaySound()
Now, let’s add our calls to PlaySound(). At the beginning of the GoalScored() method, add:
PlaySound (goalScored);At the end of the GameOver() method, add:
PlaySound (endGame);End Game Fix
The next thing we need to do is clear up a gameplay issue that’s currently in the game. When a player reaches 3 points, the game resets abruptly. We will add a popup to congratulate the winner and provide a ‘New Game’ button to restart the match.
Open BallScript and create this new method that we can access from other scripts to stop the ball moving:
public void Stop()
{
   // this method stops the ball
   myBody.velocity = Vector2.zero;
}
While you have BallScript open we will make a slight change so that the ball doesn’t always start off traveling in the same direction after a goal is scored.
At the end of the Start() method, add this extra line:
forceValue = forceValue * -1;That line effectively reverses the ball’s starting direction every time the game resets after a goal is scored. This works because the screen centre is (0,0), meaning a positive force value will push the ball to the right, and a negative value will push the ball left. Multiplying forceValue makes sure that the next time the ball starts it will go the other way. A simple little hack, but it works.
Save BallScript to apply the changes.
Now open GameManagerScript and find the GameOver() method. Replace the line:
gameBall.Reset();with:
gameBall.Stop();Now add the following new method to GameManagerScript:
public void StartNewGame()
{
   playerOneScore = 0;
   playerTwoScore = 0;
   UpdateScoreText ();
   gameBall.Reset ();
}
This method just needs to tell the ball to start again, and we will trigger it to run when our ‘New Game’ button is pressed.
Before we get to creating our end game screen, delete the following lines from the GameOver() method (as we have now placed them in the StartNewGame() method instead):
playerOneScore = 0;
playerTwoScore = 0;
UpdateScoreText ();
This just means the score stays visible until the game is reset so the winner can gloat. Save the script and go back into Unity.
EndGame Popup
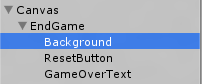
Create a new GameObject and call it EndGame. Make EndGame a child of Canvas by dragging it into the Canvas GameObject.
Add three new empty GameObjects as children to EndGame with the following names (and in the following order in the Hierarchy):
- Background
- ResetButton
- GameOverText
With the new GameObjects created the Canvas should look like this in the Hierarchy:
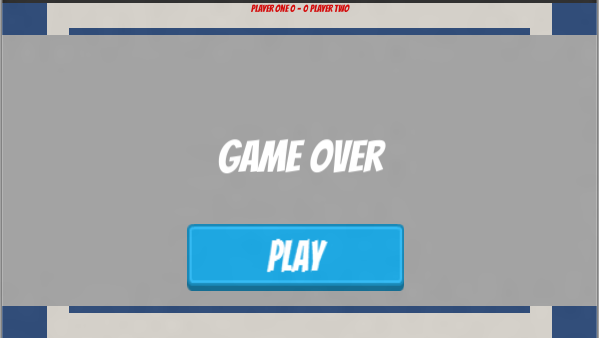
- Give ResetButton a UI Button component.
- Give GameOverText a UI Text component.
- Select GameOverText in the Hierarchy and in the Inspector add “Game Over” in its Text field.
- Style to text to be quite large, and move the transform so the text appears in the middle of the screen. (You may need to change the Width property of the Rect Transform in the Inspector to fit all the text on the screen.
- Drag the Bangers font into the Font field as well, and change the text colour if you want.
- Select ResetButton in the Hierachy.
- Add a UI Image component and drag in the PlaySprite that we used on our main menu screen.
- Within the Inspector, drag the Image (Script) component onto the Target Graphic field of the Button(Script) component just like we did on the main menu button earlier.
- Reshape the Rect Trnasform to make the button look less stretched (again, just like we did earlier). If you select the Scale tool in the toolbar in the top-left of the Unity screen you can resize transforms easily by dragging the axis lines with the squares on the end (just like how you can move the transform in Transform mode by dragging the arrows):

- Add a UI Image component to Background.
- Change Background’s Color property in the Inspector (on the Image (Script) component). Choose a colour to act as a background. This will form a box to display our little game over screen (if you want to add an image instead, go ahead – it works just like adding any other image).
- Stretch and position Background’s Rect Transform to look something like this:
Next we need to make the button restart the game. To achieve this:
- Select ResetButton in Hierarchy.
- In the Inspector, click the + at the bottom of the Button Script() component’s On Click() events area.
- Drag the GameManager GameObject from the Hierarchy into the empty field currently containing None (Object).
- In the drop-down menu (that currently reads ‘No Function’, select GameManagerScript | StartNewGame().
Now you might (rightly) be thinking ‘wait, we’ve covered our game screen with this menu’. We must implement a way to show and hide the menu.
Show and Hide the Menu
Unity lets us turn GameObjects on and off via the SetActive() method. We’ll add a reference to the EndGame GameObject in GameManagerScript, then at the relevant times we will set EndGame’s active status to on (true) or off (false).
Add a serialized field to GameManagerScript:
[SerializeField] GameObject endGameScreen;Now you must populate that serialized field with the EndGame object. Select GameManager in the Hierarchy and drag EndGame onto the End Game Screen field.
Let’s clean up some code as well. You will notice that the Start() and StartNewGame() methods have some identical code. We don’t need repetition. We don’t need repetition. We don’t need repetition. Replace those two methods with the code below, to which I’ve also added a command to hide the end game screen:
public void StartNewGame()
{
  playerOneScore = 0;
  playerTwoScore = 0;
  UpdateScoreText ();
  endGameScreen.SetActive (false);
  gameBall.Reset ();
}

void Start ()
{
   audSource = GetComponent<AudioSource>();
   StartNewGame ();
}
Add this to the GameOver() method, just after the gameBall.Stop() line:
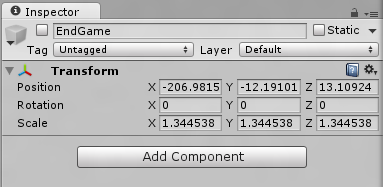
endGameScreen.SetActive (true);Now disable EndGame by default by turning off its transform. Select EndGame in the Hierarchy, then untick the little checkbox in the upper-left corner beside its name:
This also hides it while we’re in Unity working on our game.
Test the Game
Now hit the Play button and try out the game…
…weird, huh? The ball just moves up and down! It’s almost like we’ve taken a step backwards…
What happened is that when we changed GameManagerScript we inadvertently made the Ball’s Start() script execute twice, pushing the ball in one direction, then immediately in the opposite direction. This sort of thing can happen when you access public methods and variables between scripts, which is one reason you should avoid public whenever possible.
Fix BallScript
Let’s rework BallScript a bit to remedy the above problem. Open BallScript. As you see, the Reset() function calls the Start() function. We also call Reset() from GameManagerScript whenever a new point or game starts.
Cut the following lines from Start() and paste them into Reset() at the end of the method:
myBody.AddForce (new Vector2 (forceValue * 50, 50));
forceValue = forceValue * -1;
Also, remove the call to Start() from within Reset(). Save the script, save the scene, then playtest the game. That’s better!
Recap
A lot of what we did was familiar, such as populating fields that were exposed in the Inspector via [SerializeField]. We added audio clips to GameManagerScript this way. We then used references to those audio clips to play the sounds we wanted at specific times during the game. OK, the sounds aren’t exactly thrilling, but hey, you’ve learned how to add sounds to a Unity game, right?
We also touched upon Unity’s ways of finding components and GameObjects from a script via the GameObject.Find and GetComponent methods. We learned that these shouldn’t be used in any code that frequently repeats.
We did a bit more work with Unity 4.6’s new GUI system to create our end game screen, and learned a few more scripting techniques in the process. We went and added a few improvements to our scripts. The game still needs a little more…juice.
More about that in Part 10.
Help! I’ve followed this guide faithfully but the reset button doesn’t work. What have I done wrong? Any suggestions?
When you say the button doesn’t work, does it actually look like it’s being clicked but doesn’t restart the game? Or does it look like it’s not being clicked (it should change colour slightly when clicked).
If it’s not being clicked it might be that something is in front of it that is ‘stealing’ the click. Try moving the button up in the hierarchy so that it is clickable.
If it is being clicked but not restarting the game there must be something wrong either in the script or in the button (i.e. what the button is being told to do when clicked).
Thanks for the reply. I had to restart the project from the very beginning, and now I’ve got it working somehow. Again, thanks!
I had this same issue, and it turned out that the GameOverText object was overlapping with the Reset button (the text itself was not overlapping on the scene, just the container object); Additionally, the GameOverText object was actually being rendered on top of the Reset button (despite the ResetButton object being higher up in the EndGame hierarchy)
I was able to resolve this by manually reshaping the GameOverText object to not overlap with the ResetButton object.
When I add call ’StartNewGame ();’ to the Start() method (in GameManagerScript) Unity complains:
NullReferenceException: Object reference not set to an instance of an object
BallScript.Reset () (at Assets/Scripts/BallScript.cs:31)
GameManagerScript.StartNewGame () (at Assets/Scripts/GameManagerScript.cs:47)
GameManagerScript.Start () (at Assets/Scripts/GameManagerScript.cs:33)
. . . but the game plays as before.
Then, in BallScript, when I ‘Cut the following lines from Start() and paste them into Reset() at the end of the method:’
myBody.AddForce (new Vector2 (forceValue * 50, 50));
forceValue = forceValue * -1;
The Game refuses to play.
I hope you can help.
P.S. I am having to post this again as it doesn’t appear to have uploaded the first time.
A null reference exception means you are trying to access something that doesn’t exist (specifically you’re trying to access a script reference that has not yet got a reference to an actual script). It’s hard to tell without going through the code, but it looks like that first problem is that the code can’t reset the ball (presumably the code to set the ball script reference is missing…
…this is *probably* what is wrong: in the GameManager script you should have the following code:
[SerializeField]BallScript gameBall;
That [SerializeField] means the gameBall field will show in the Unity Inspector panel. You need to drag-and-drop the ball gameobject from the Hierarchy into that Game Ball field so the script knows what the game ball is referring to. The instructions for this are about halfway down Part 7 of the Pong tutorial. It’s been a while since I wrote the code, but I think the reason it throws the error but still works is that resetting the ball isn’t required at the start of the game because it would just reset it to the state it’s already in.
The second issue is probably caused by the same root problem, so hopefully that will go away.
If it still doesn’t work, I recommend downloading the finished project and comparing the script(s) to your own. It’s very easy to miss something or mis-type something.
Thanks for the reply. The GameManageScript has
[SerializedField] BallScript gameBall;
and I have the Ball (BallScript) object linked to the Game Ball field in the Game Manager Script component of the Game Manager.
I have also tried replacing the GameManagerScript by pasting the code from the project download file.
Unity throws the same error.
This may suggest the problem is not the code.
Try downloading and running the completed project. It has been tested on Unity 5.5 and works correctly. If the complete project works, you’ll have to figure out where something in your project doesn’t match up. Check the ball script’s code.
After checking both the BallScript along with the GameManagerScript, and the SerializedField connections, I decided to delete the script components for the GameObjects and replace them with fresh components and make new field connections. This fixed the problem, which I think was something under the hood, in the GameManager/Ball field connection. It took a couple of attempts to re-make this link.
BTW, I note you do not delete the source GameObject ’s when making either the WallPrefab or PaddlePrefab, so why do you delete the source GameObject for the GoalPrefab?
I don’t understand why I cut the Start() method you mentioned above the ball just stop. So I undid it and then the ball move up and down after the first game over.
Hi Damien.
I had the same problem as everyone else here after changing GameManagerScript and BallScript (the ball not moving and Error messages on Unity’s console)
The problem is the order the scripts are being run.
GameManagerScript is running before BallScript so when GameManagerScript calls gameBall.Reset(), the reference to the RigidBody2D is NULL because BallScript hasn’t run its Start() method yet.
The order it’s running is:
GameManagerScript: Start() > StartNewGame() > gameBall.Reset() > BallScript::Reset() > myBody.velocity = Vector2.zero;
but BallScript::Start() hasn’t run yet so myBody is NULL
I don’t know what’s the best solution for this since I don’t know how Unity chooses when to run things but I solved it by going to Edit > Project Settings > Script Execution Order and by clicking the + icon I set BallScript first and GameManagerScript second.
Thanks for posting this. I will try to come up with a workaround and update the tutorial when I get a chance.
If anyone is having a problem with the ball not moving and Unity giving an error there’s a fix. Open Ball script and add [SerializeField]
Rigidbody2D myBody;
and drag Rigidbody 2D to a field in the script