Paddles, Prefabs, and Proper Folder Structure
We covered a lot of strange new concepts in Part 1, so in Part 2 we’ll solidify those fundamentals before moving on to other new topics.
We’re going to create a couple of new GameObjects for our player paddles, and this time you will use a prefab. We’ll also do a little housework on our project’s assets folder and dabble in the Scene window a little bit.
Create a Paddle
For this simple Pong game we need two sticks for our players to control. Let’s create the first paddle. This is done exactly the same way we created the ball, but with a box (i.e. rectangle) collider instead of a circle collider.
I’ve provided a sprite in the Pong Assets zip file, so drag that sprite into the Assets folder.
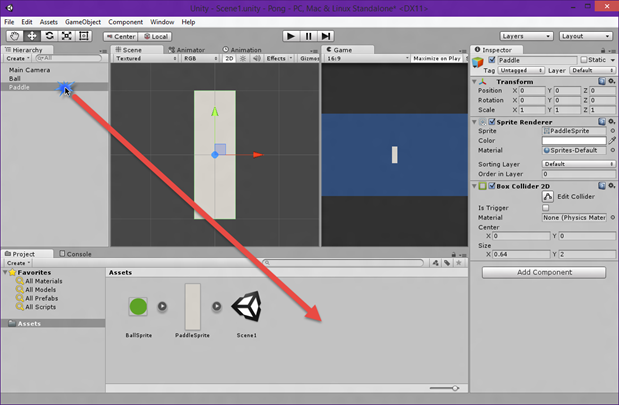
Build the Paddle
- Create an empty GameObject in Hierarchy and rename it to ‘Paddle’.
- Add a sprite renderer component to Paddle, and drag PaddleSprite into the empty Sprite field.
- Add a Box Collider 2D component.
Now you have a GameObject called Paddle with a sprite and a collider. You will notice that it is currently in the same position as the ball (the centre of the screen). Leave it there for now, we’ll worry about moving it later.
Create a Prefab
Our game needs two paddles, and there are a few ways of doing this:
- Create a second paddle following the same steps as above
- Duplicate the first paddle, or
- Create a prefab and use that to create as many paddles as we want.
We will create a prefab (even though it’s not really necessary when we only need two copies). Prefabs have some powerful benefits:
- Changing the base prefab will also change all copies (or instances) of it (e.g. if you need to resize a component or attach a new script).
- Each prefab instance can have unique properties (e.g. you can use different sprites or weapons to create enemies that are mostly the same but with a few dufferences).
A prefab is just a GameObject that is saved in your game assets (as opposed to just existing in a scene). The typical way to create a prefab is to build the GameObject, then drag it into the Assets folder.
Make a Prefab
We already created a paddle, so drag-and-drop that from Hierarchy into the Assets folder to create the prefab (the ‘original’ stays in the Hierarchy, but a copy is added to Assets):

Rename the prefab you’ve just created to ‘PaddlePrefab’ (to rename, press F2 or right-click the item and choose Rename).
Take a look in Hierarchy and you should notice two things:

- The paddle has now adopted the name of PaddlePrefab
- PaddlePrefab in the Hierarchy is in blue text, indicating that it is a prefab instance.
Prefab notes
- Changing a prefab applies those changes to copies (instances) of that prefab
- Changing an individual instance of a prefab will not affect the base prefab (or other instances of it).
Create a Prefab Instance
To create a prefab instance in a scene you simply drag-and-drop the prefab from the Assets folder into Hierarchy. Add a second paddle by drag-and-dropping PaddlePrefab into Hierarchy.
Your Hierarchy now should look like this:

Again the new paddle has the same position at the centre of the screen as the other items. We won’t worry about this just yet.
Tidying Up the Project
It’s important to keep your project organised so you can easily zip around and find what you need. It may not seem necessary in a simple game like Pong, but when your projects start getting more sophisticated you will benefit hugely from knowing how to find everything quickly.
The Hierarchy
Using what you’ve learned so far, clean up Hierarchy:
- Rename those two paddles to ‘Player1’ and ‘Player2’.
- Create an empty GameObject called ‘Players’ and move Player1 and Player2 inside it (drag-and-drop). Player1 and Player2 are now ‘children’ of Players.
Now your Hierarchy should look like this:


The Assets Folder
It is vital to keep the Assets folder well structured. Even though we currently only have a few assets in our game, that doesn’t mean we shouldn’t organise them properly. We will create subfolders to organise out assets.
To create a folder, right-click on the Assets folder name (or in any empty space within the folder view) and choose Create | Folder from the context menu.
The new folder will have the name ‘New Folder’, but you will rename your folders.
Create the following folders inside the Assets folder:
- Sprites
- Prefabs
- Scenes.
Then drag-and-drop all of the assets into the appropriate folder, being careful to not mix up the PaddlePrefab and PaddleSprite items as they will look basically the same. When you’re done you will have a neatly organised project where everything is easy to find.
Recap
Now your game project is cleanly organised and ready for Part 3. Save your project and scene. In its current state your game isn’t much of a game, but that will quickly change.
Let’s recap what we did in Part 2:
- We created a paddle GameObject.
- We converted that paddle into a prefab, and in doing so learned the basics of prefabs in Unity.
- We cleaned up our Hierarchy and Assets folder by organising our files and GameObjects.
Much of what we did in Part 2 might seem pedantic and unnecessary (e.g. creating a prefab when we only need two identical copies of something, or creating subfolders when we only have a few components), but we did those things because in a normal game they would be invaluable to your workflow. Although we are creating a simple Pong game there is no reason to not use sensible best practices to organise your game.
We’ve been moving pretty slowly so far, and focusing on fundamentals. We will start putting those fundamentals to use in shaping this project into something resembling a game in the next part.
Continue to Part 3.
2 thoughts on “Beginner’s Guide: Create a Pong Clone in Unity: Part 2”